ShopDreamUp AI ArtDreamUp
Deviation Actions
Daily Deviation
Daily Deviation
December 26, 2010
Gimp users, need realistic animated snow? Your wish is granted with ~fence-post's cool GIMP Animated Snowfall Script; it's icy magic at your fingertips!
Featured by FantasyStock

AI Backgrounds
1 Subscriber
You will get ALL of the AI backgrounds that I generate. They will all be either widescreen (16:9), portrait (3:4), or square (1:1) ratio. Commercial use is allowed :) There will be A LOT of images posted here!
$3/month


Suggested Deviants


Suggested Collections


You Might Like…


Featured in Groups


Description
November 28, 2019 - Sorry for the broken script. I know this has been a LONG time coming, but I've been out of the graphics game for awhile. Here's a version that works with the newest version of GIMP 2.10.14!
Hard to believe this script is now 10 years old and still getting lots of requests!!!
The new script works in the same fashion as before, with a couple of minor changes. You can either add it to a single image or an existing animation (convert it to an RGB type first - Image Menu > Mode > RGB). I've removed the option to export the separate images. Not sure how useful that was.
You can also set the snowflake size and blur the flakes.
Make sure you delete your previous script if you had it installed to avoid conflicts.
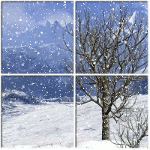
Just in time for Christmas! Here's a script that will let you take any background image (must be RGB type) and turn it into an animated snowfall. The script is based on my tutorial here: fence-post.deviantart.com/art/…
There are no limitations on using it....just have fun. A note would be nice, but a fave would be even better!
Installation Instructions
Click on the Download link to save the zip file.
Once saved to your computer, double-click the zip file to open.
Copy and paste the AnimatedSnow.scm file to your GIMP Scripts folder: C:\Users\username\AppData\Roaming\GIMP\2.10\scripts (preferred location) or C:\Program Files\GIMP 2\share\gimp\2.0\scripts (least preferred location as this is where GIMP stores the scripts that comes with it).
If GIMP is open, go to Filters > Script-Fu > Refresh Scripts so that GIMP will recognize the script. If GIMP isn't open, open it.
Open up the image you would like as your background and go to Filters > Animation > Animated Snow... and set the parameters (default parameters should work just fine).
Save as an animated gif. Keep in mind that large images with lots of frames = BIG file sizes!
Here's a few preview images:
Let me know if you have any problems with the script. Enjoy!
Art
Hard to believe this script is now 10 years old and still getting lots of requests!!!
The new script works in the same fashion as before, with a couple of minor changes. You can either add it to a single image or an existing animation (convert it to an RGB type first - Image Menu > Mode > RGB). I've removed the option to export the separate images. Not sure how useful that was.
You can also set the snowflake size and blur the flakes.
Make sure you delete your previous script if you had it installed to avoid conflicts.
Just in time for Christmas! Here's a script that will let you take any background image (must be RGB type) and turn it into an animated snowfall. The script is based on my tutorial here: fence-post.deviantart.com/art/…
There are no limitations on using it....just have fun. A note would be nice, but a fave would be even better!
Installation Instructions
Click on the Download link to save the zip file.
Once saved to your computer, double-click the zip file to open.
Copy and paste the AnimatedSnow.scm file to your GIMP Scripts folder: C:\Users\username\AppData\Roaming\GIMP\2.10\scripts (preferred location) or C:\Program Files\GIMP 2\share\gimp\2.0\scripts (least preferred location as this is where GIMP stores the scripts that comes with it).
If GIMP is open, go to Filters > Script-Fu > Refresh Scripts so that GIMP will recognize the script. If GIMP isn't open, open it.
Open up the image you would like as your background and go to Filters > Animation > Animated Snow... and set the parameters (default parameters should work just fine).
Save as an animated gif. Keep in mind that large images with lots of frames = BIG file sizes!
Here's a few preview images:
Let me know if you have any problems with the script. Enjoy!
Art
Comments180
Join the community to add your comment. Already a deviant? Log In
Hi, thank you for sharing :)